Smart Pension
The following guidance is specifically designed for users who have registered with Smart Pension for their AE qualifying pension scheme.
Please note: this guide should only be used after setting up your pension scheme with Smart Pension.
1. Entering your Staging Date in BrightPay
a) To enter your staging date in BrightPay, click Pensions > Automatic Enrolment
b) Enter your staging date in the field provided:
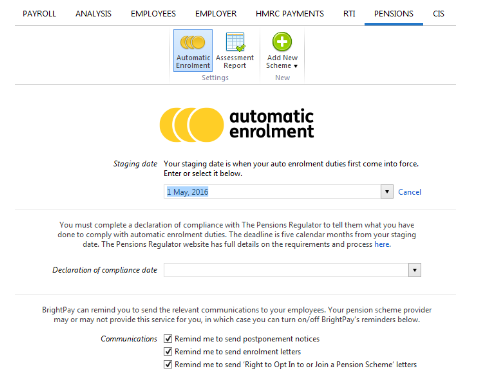
c) Click Save
Entering your staging date here will ensure that your on screen automatic enrolment alerts will start at the correct time for you.
2. Entering your Smart Pension Scheme in BrightPay
a) Click Pensions > Add New Scheme > followed by Smart Pension
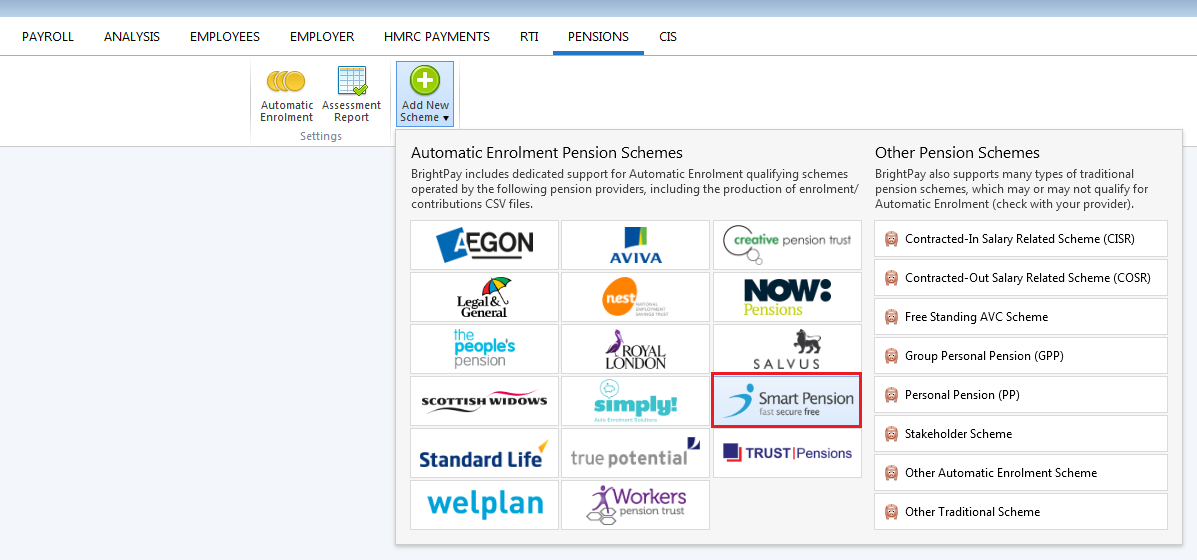
Please note: when entering your Smart pension scheme details in BrightPay, care should be taken that details entered in BrightPay match exactly to how they are set up with Smart Pension. This is to ensure that enrolment files and contribution files will submit successfully for you.
b) Within Registration Details, manually enter your Company ID and API key, as provided by Smart Pension.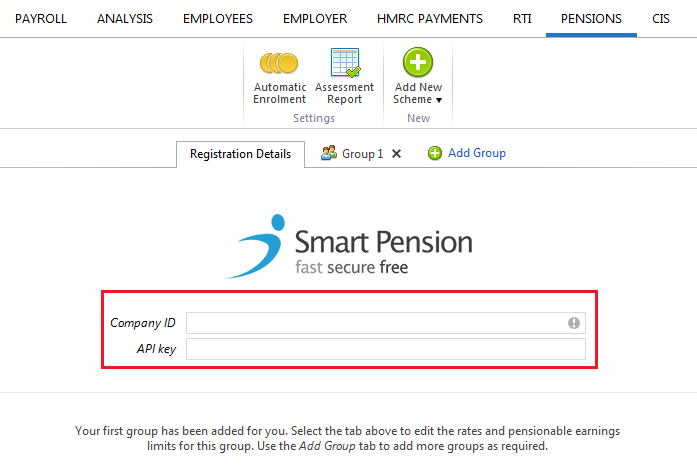
c) On the next tab, enter the Name of your first group which you have set up with Smart Pension. 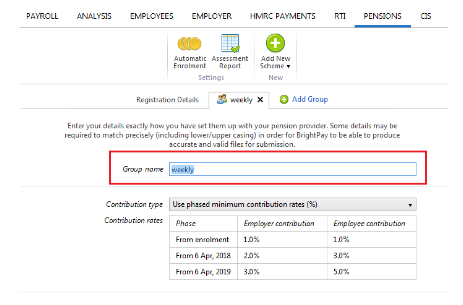
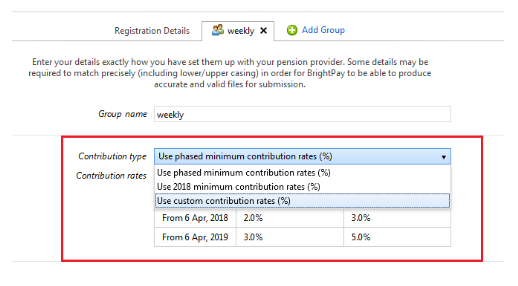
d) Select the Contribution Type that is to apply to this group by clicking on the drop-down menu:
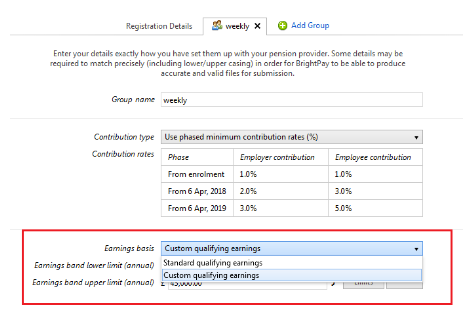
e) Next select the Earnings Basis that is also to apply:
- 'Standard Qualifying Earnings' will apply the earnings band lower limit and upper limit as set by the DWP for the tax year in question.
- 'Custom Qualifying Earnings' will allow you to remove these limits and set those that you require, if applicable.
f) If you have more than one group set up with your Smart Pension (e.g. to cater for employees on a different pay frequency or employees with different contribution rates), click 'Add Group' and repeat steps c) to e).
g) Click Save to save your details
Please note: contribution rates and earnings bands are set as a default, meeting the minimum requirements for automatic enrolment. However each one of these is flexible to allow the employer to amend to suit their particular pension arrangements.
h) Smart Pension will send the various enrolment letters to your employees for you, therefore BrightPay's reminders to send these letters can be turned off.
After saving your pension scheme details, at the prompt, select 'Yes' to turn off these alerts (although you will still be able to create/send them if desired) or select 'No' in order for BrightPay to continue to remind you (which you can of course ignore).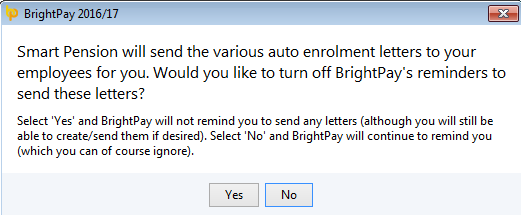
3. Assessing your Employees using BrightPay
As soon as you reach your staging date in your Payroll utility, BrightPay will automatically assess your employees for you and determine whether your employees are eligible jobholders, non eligible jobholders or entitled workers.
On-screen flags and yellow alerts will appear to notify you that you now have automatic enrolment duties to perform.
These alerts will bring you through to the various actions available based on the selected employee’s work category by clicking on 'View Options':

4. Enrolling your Employees in BrightPay
BrightPay will indicate an employee's Eligible Jobholder status on the yellow bar in their payroll screen.
a) Click 'View Options' to bring you through to the various actions based on this worker category:
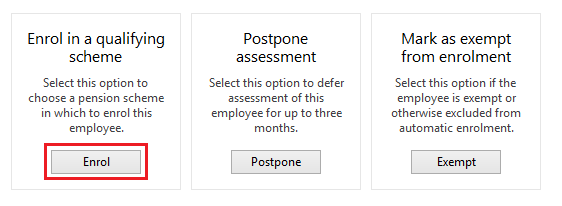
b) To enrol an eligible employee, simply select Enrol and choose your Smart Pension group from the drop down menu.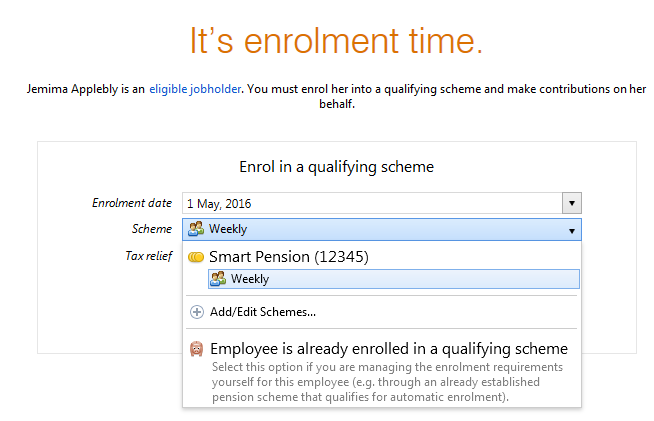
c) Tax Relief - Smart Pension operate using the Net Pay Arrangement method of tax relief, therefore this option should be chosen from the drop down menu (unless you are aware that the employee is not entitled to tax relief).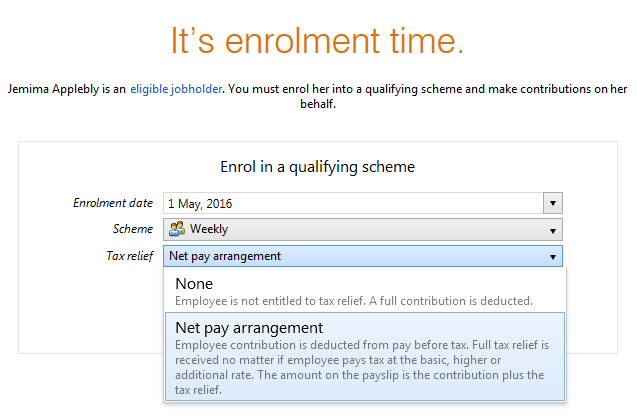
d) Click Continue to enrol the employee selected. Alternatively, click 'Enrol multiple employees with these settings..' to batch enrol employees who are to be be enrolled into the same group. The status of each employee selected will be updated to 'Enrolled':
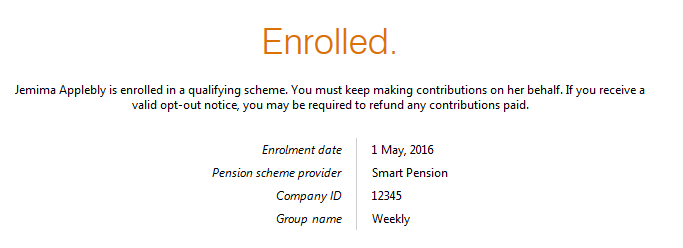
5. Communicating with your Employees
i) Eligible Jobholders
Once an employee has been enrolled, they must be provided with a statutory enrolment letter. An employee's enrolment letter will include information about:
- their enrolment status
- their date of enrolment
- the Scheme into which the employee is enrolled
- contributions which are now attached to their earnings
- how to opt out should they choose to do so
- general information on how automatic enrolment will benefit the employee
Smart Pension will take care of this communication for you and thus there is no requirement to create this letter in BrightPay.
ii) Notifying Non-Eligible Jobholders & Entitled Workers of their right to opt in/ join
Non-eligible jobholders are workers who are not eligible for automatic enrolment but can "choose to opt in" to a pension scheme. Entitled Workers are workers who are not eligible for automatic enrolment but are "entitled to join" a pension scheme.
Such employees must be provided with information about their right to opt in/join a qualifying AE scheme.
Smart Pension will be responsible for sending this communication to these categories of workers and thus there is no requirement to create these letters within BrightPay itself.
6. Postponing Employees in BrightPay
You can use postponement to delay automatic enrolment for some or all employees for up to three months.
a) To postpone an employee, click 'View Options', followed by Postpone:

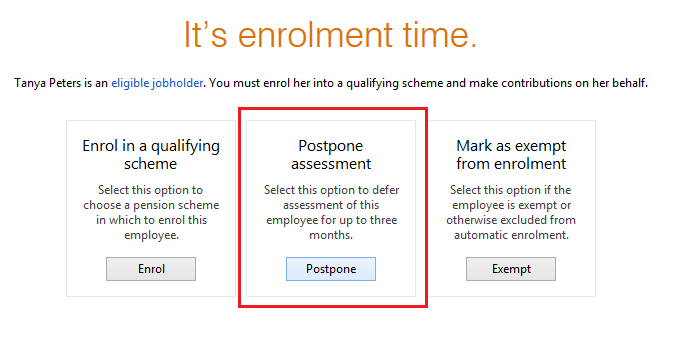
b) Enter the assessment date and deferral date applicable to the employee. Click Continue to postpone the employee selected. Alternatively, click 'Postpone assessment until the date entered for multiple employees...' to batch postpone employees who are to be postponed to the same date:
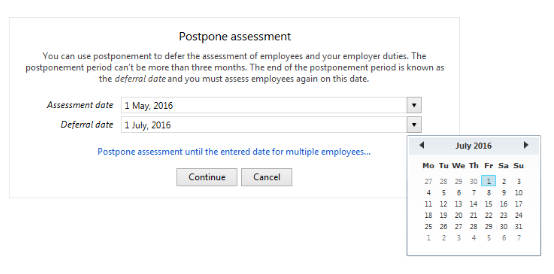
BrightPay will validate the date entered to ensure that it is no more than 3 months from the staging date.
c) If postponement is used, the employee must be provided with a statutory postponement letter. Once again, Smart Pension will be able to send these letters for you, so there is no requirement to create these in BrightPay.
For Smart Pension to send postponement letters for you, log in to your Smart Pension web portal and go to 'Menu > Scheme Setup > Postponement'.
7.Processing Pension Contributions
Once employees have been enrolled, have joined or opted-in, their pension deductions will automatically be applied to their payslips going forward. The deduction applied to the payslip will be made in accordance with the contribution rates and earnings bands selected when setting up the pension scheme in BrightPay.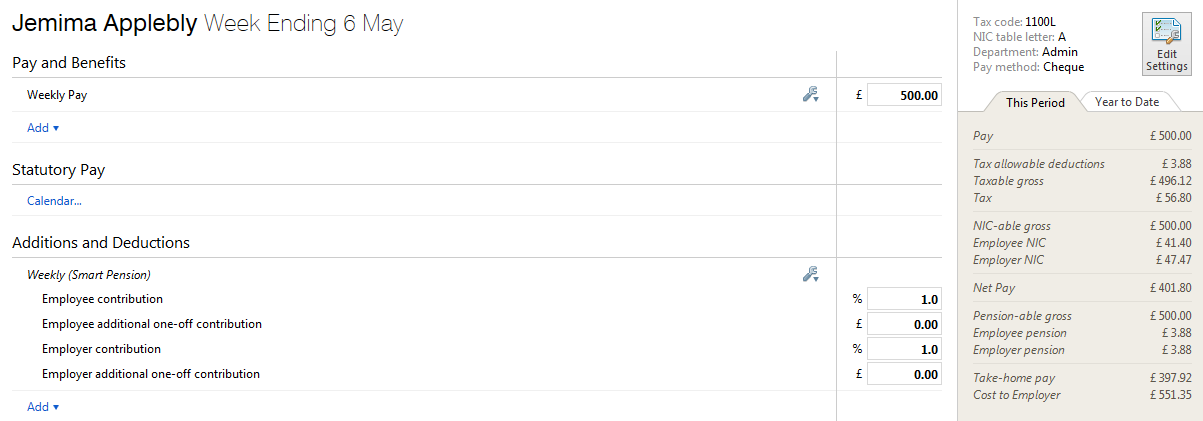
On finalising payslips, their pension deductions will also be reflected on their payslip: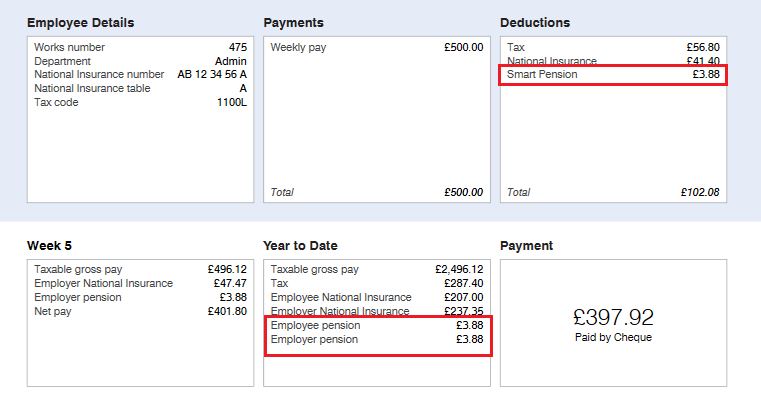
8. Submitting your Enrolment Files & Contributions Files to Smart Pension (using API)
i) Enrolment Submission
Once employees have been enrolled into your Smart Pension pension scheme, you will be required to submit an enrolment file to Smart Pension. Smart Pension's API option will allow you to create and submit your enrolment files directly from BrightPay into your Smart Pension web portal. To submit your enrolment file in this manner:
a) Click into the Pensions utility and select Smart Pension on the menu toolbar
b) Under Edit Details & Groups, manually enter your company ID and API key accordingly, if not already entered.
c) Select Enrolment Summary on the menu bar, followed by ‘Send enrolment submission..’:
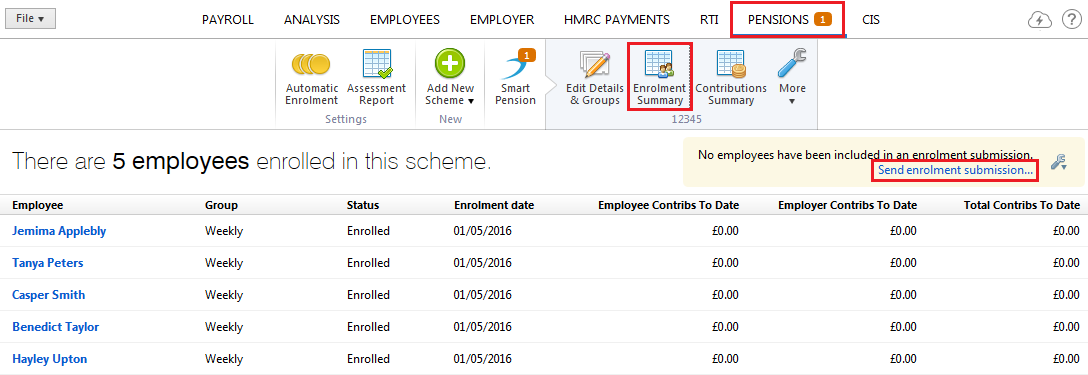
d) At step 1, select the employees you wish to include in your enrolment submission. Click Next.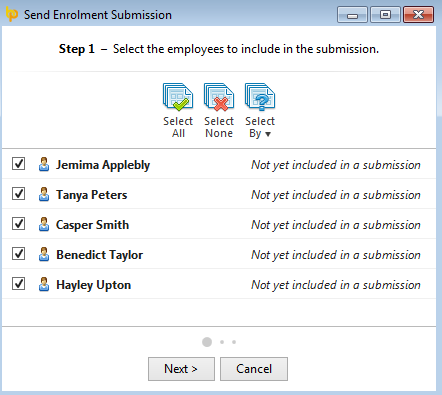
e) At step 2, enter additional employee details as required. Click Next.
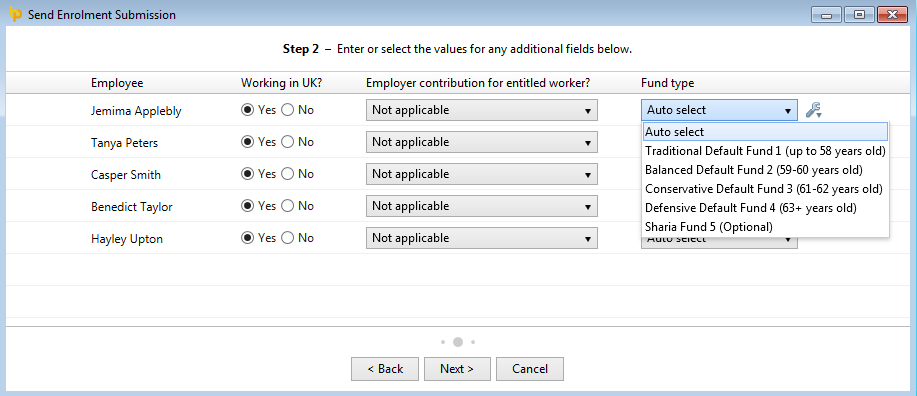
f) At step 3, simply click ‘Send Now’ to submit your enrolment submission to Smart Pension. 
Important Note
Smart Pension assigns an 'ID' to each enrolled employee which BrightPay requires to be able to submit contribution details. If you enrol an employee into Smart Pension directly from BrightPay, the ID is retrieved for you automatically. But if you enrol an employee by any other means (e.g. directly on the Smart Pension website), you'll need to manually enter the ID. This can be done by clicking on 'More > 'View/Enter Smart Pension Employee ID Values..' on the menu bar and entering the employee IDs manually:
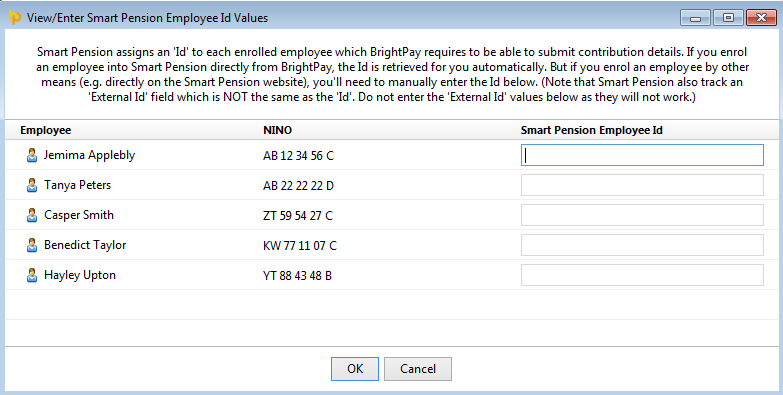
ii) Contributions File
Once your enrolment submission has been submitted, Smart Pension require you to submit a Contributions File every pay period thereon to report contributions made for each employee.
a) Finalise the pay period in question within the Payroll utility.
b) Within the Pensions utility, select Contributions Summary on the menu bar and click ‘Send submission’ for the pay period in question. 
c) Choose the period which you would like to send the submission for. Click Next.
d) At step 2, select the employees you wish to include in the contributions file submission. Click Next.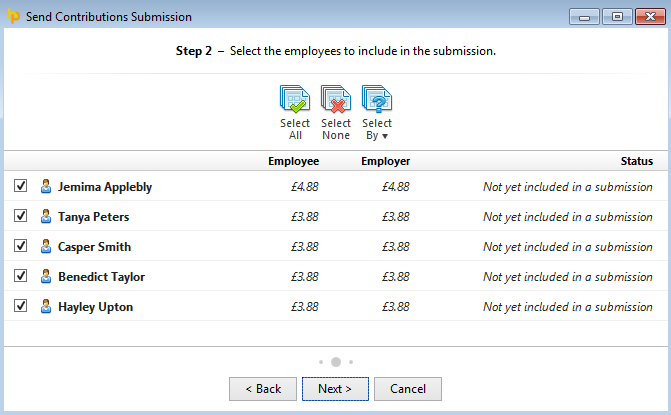
f) At step 3, simply click ‘Send Now’ to submit your contributions information to Smart Pension.

9. Ongoing Assessment of Employees
After staging, BrightPay will continue to monitor your employees for you and will alert you when you have further AE duties to perform.
Examples of when you may have further duties to perform are:
- a new starter commencing employment with you
- an existing employee now with earnings above the earnings trigger for automatic enrolment
- an employee turning 22 (with qualifying earnings)
- when a postponement period ends and an employee is re-assessed
Need help? Support is available at 0345 9390019 or [email protected].


